A car’s Automotive Electrical Repair system is comprised of several key components that work together to power the vehicle and keep it running. The main parts of the electrical system include:
Battery – The car battery provides the initial power to start the engine and powers all the electronics when the car is off. It is a lead-acid battery that can produce 12-14 volts. The battery is recharged by the alternator while driving.
Alternator – The alternator is belt-driven off the engine and generates electricity to recharge the battery while the vehicle is running. It converts mechanical energy into electrical energy.
Starter – The starter motor engages when the key is turned to start the engine. It spins the engine to get it going. The starter requires a huge jolt of power from the battery to operate.
Ignition system – The ignition system includes components like the ignition coil, distributor, and spark plugs that help ignite the fuel in the engine to generate power. The ignition system relies on electricity from the battery.
Lights – All the exterior lights like headlights, brake lights, and turn signals run off the car’s electrical system, as do interior lights. These are powered by the alternator when the car is on and the battery when it’s off.
In-car electronics – Modern cars have many electronics like the radio, power windows, windshield wipers, power locks, and more that use the car’s electrical power. These amenities rely on a steady voltage from the charging system when driving.
This overview covers the major electrical components in vehicles that allow engines to start and accessories to function. Problems with any part of this system can cause issues that require electrical repairs.
Common Electrical Problems
Many automotive electrical issues stem from a few common problems. Being able to identify the likely culprit can help drivers diagnose and resolve problems efficiently. Here are some of the most common electrical issues in vehicles:
Dead Battery
The battery is crucial for starting the vehicle and powering all the electronics. A dead battery that fails to hold a charge is one of the most frequent electrical problems. Causes include a faulty alternator not recharging the battery, parasitic drains, damaged battery cables, or simply an old battery at the end of its lifespan. Warning signs include dim lights, struggling to start the engine, and the battery light illuminating on the dash.
Alternator Issues
The alternator powers the vehicle’s electrical system while driving and recharges the battery. If the alternator fails, the battery won’t get recharged and will eventually die. Signs of a bad alternator include the battery light coming on while driving, electrical components like lights dimming, and the engine stalling or not starting due to a drained battery. Replacing the alternator and battery testing is key.
Starter Problems
Starter issues can prevent the engine from cranking when turning the key. This could point to a dead battery, poor battery connection, bad starter solenoid, or a worn-out starter motor. Starters can wear out over time from heat damage or excessive cranking. Listen for clicking or grinding noises when trying to start.
Faulty Wiring
Exposed, damaged, or deteriorated wiring and connectors are common in older vehicles. This can cause electrical shorts, drains, fires, or components to fail. Inspect wiring harnesses for damage. Electrical tape and wire splice repairs are temporary fixes. For safety, have degraded wiring replaced.
Diagnosing Electrical Issues
Diagnosing electrical issues in a vehicle can seem daunting, but with some basic tools and diagnostic steps, you can often track down the source of the problem. Here are some tips for diagnosing common electrical issues:
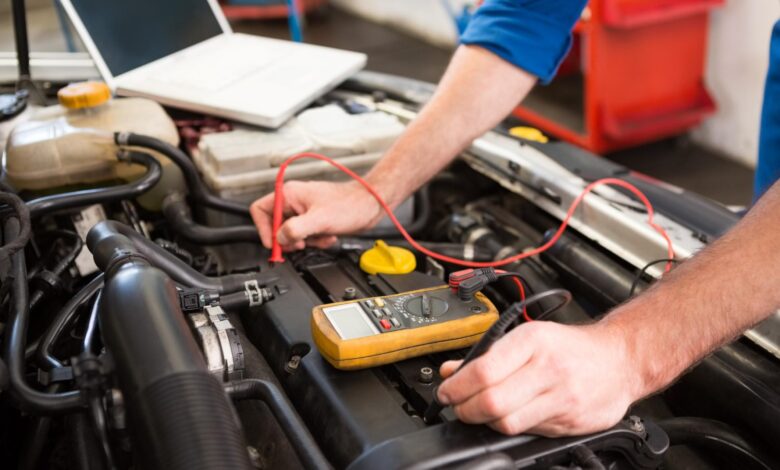
Use a Multimeter
One of the most important tools for diagnosing electrical problems is a multimeter. This tool lets you measure voltage, current, and resistance throughout the electrical system. Start by testing the battery voltage. A healthy battery should have 12+ volts with the engine off. The multimeter can also check for voltage drops along circuits and measure the output of components like the alternator.
Check Fuses
Many electrical issues stem from blown fuses, which are designed to fail before more expensive components get damaged. Examine all the fuses and look for any that appear discolored or melted. Swap suspected blown fuses with ones from circuits that aren’t critical like accessory or radio fuses.
Inspect Wires and Connections
Problems often arise from damaged wires or loose/corroded connections. Visually inspect wires for cracks, burning, or chafing. Wiggle wiring harnesses while the car is running to see if connections are loose. Check that ground connections are tight and free of corrosion. Repair any damaged wires and clean contact points with electrical cleaner.
Pay attention to these basic troubleshooting techniques when diagnosing electrical issues. Through methodical checks using a multimeter, fuse inspection, and wire/connection examination, you can often find the root cause and get your vehicle back on the road.
Battery Maintenance and Replacement
A car’s battery is crucial for providing power to the starter and electrical system when the engine is off. Here are some tips for maintaining and replacing batteries:
Testing Battery Charge
Use a battery tester to check the charge level. A fully charged battery should have 12.6 volts or higher. Anything less than 12 volts indicates a weak battery that needs to be recharged or replaced.
Check the battery posts and cable connections to ensure they are tight and free of corrosion. Loose connections can prevent the battery from charging properly. Clean any corrosion with a wire brush and baking soda/water solution.
Replacing Dead Batteries
If the battery is more than 5 years old, it may simply need to be replaced, even if it’s holding some charge. The average car battery lasts 3-5 years.
When replacing a battery, choose one with the same group size, cold cranking amps (CCA), and reserve capacity as the original. The battery specifications are usually printed on the old battery or in the owner’s manual.
Safely disconnect the old battery – remove the negative cable first, then positive one. Reverse the order to connect the new battery.
Battery Maintenance Tips
- Keep the battery posts and connections clean to prevent corrosion.
- Avoid draining the battery completely, as this shortens its lifespan.
- If the car isn’t driven regularly, consider a battery tender to keep the battery charged.
- Store the battery indoors during winter to protect it from temperature extremes.
- Consider upgrading to a longer-life battery like an AGM or gel cell battery.
Alternator and Charging System Repair
The alternator is responsible for charging the battery and powering the electrical system while the car is running. Signs of alternator problems include:
-
Dimming headlights when idling – As engine RPMs decrease, the alternator can’t produce enough power to keep the battery charged.
-
Battery not charging properly – Test with a voltmeter. Normal voltage should be 13.5-15.5 volts with engine running. Below 12.4 volts indicates a problem.
-
Battery dying overnight – The alternator isn’t charging the battery sufficiently while driving.
-
Whining noise from alternator – May indicate worn bearings.
-
Check engine light – The ECU detects abnormal voltage readings.
To test the alternator:
-
Turn off all electrical accessories.
-
Start the engine and let it idle.
-
Using a voltmeter, check the voltage at the battery terminals. Should be 13.5-15.5 volts.
-
Turn on headlights and any other electronics. Voltage should stay in range.
-
Rev the engine. Voltage should go up as RPMs increase.
If the voltage is outside the normal range, the alternator needs replacing. When replacing:
-
Disconnect negative battery terminal.
-
Remove the serpentine belt.
-
Unbolt old alternator and remove all wiring.
-
Install new alternator and reconnect wiring.
-
Reinstall serpentine belt.
-
Reconnect battery and test the operation.
Replacing a faulty alternator will ensure proper charging and prevent further electrical issues.
Starter Repair and Replacement
A failing starter is one of the most common causes of a car not starting. Symptoms of a bad starter include:
-
The engine not cranking or turning over when the key is turned. You may hear a single click or repeated rapid clicking.
-
The starter spins but does not engage the engine. This results in a whirring noise without the engine cranking.
-
The starter engages but the engine turns over slowly or without enough power to start. The cranking will be labored.
-
Intermittent issues where the starter works sometimes but fails at others. This points to a failing starter solenoid.
-
Strange smells or smoke coming from the starter. This indicates overheating.
Starter issues can be diagnosed by testing the starter prior to replacement. Use a multimeter to check the voltage at the starter while an assistant turns the ignition. A healthy starter should have 9-12 volts. Next, test that the starter is receiving current by connecting the multimeter leads to the small wire on the solenoid and the battery-positive terminal. The current should flow when the ignition is turned.
If testing confirms starter failure, replacement is necessary. The starter is located low on the engine block, accessible from below the vehicle. Replacement involves:
-
Disconnecting the negative battery terminal.
-
Unbolting the starter and detaching all electrical connections.
-
Installing the new starter, attaching the wires, and bolting it in place.
-
Reconnecting the battery and testing operation.
Starter replacement is a straightforward DIY job on most vehicles with basic tools. Consult a vehicle repair manual for the proper starter replacement procedure for your specific vehicle’s make and model. Proper handling of electrical connectors and torque specs for mounting bolts is important.
Electrical Wiring Repairs
Electrical wiring issues are common in older vehicles. Over time, the insulation around wires can become cracked or damaged, exposing the metal conductor inside. This can lead to short circuits, power losses, and electrical fires if left unaddressed. Some common wiring problems to look out for include:
-
Fraying or cracked wire insulation. Check under the hood, under the dash, and in the doors for any exposed copper wiring. Use electrical tape to wrap any exposed sections.
-
Corroded or oxidized wire connections. Corrosion buildup can prevent proper electrical contact. Clean battery terminals and ground wires with a wire brush. Apply dielectric grease to prevent future oxidation.
-
Loose wiring connections. Vibration can cause wires to detach from connectors. Inspect where wiring harnesses plug into components and ensure a tight fit.
-
Damaged or cut wires. Look for any punctured wiring insulation or bare copper conductors. You may need to splice severed wires together.
Splicing Wires: If a wire is cut or damaged, you can splice it back together. Cut back the insulation on each side of the break to expose 1/2 inch of clean copper. Twist the copper strands together tightly and secure with a wire crimp connector. Cover with heat shrink tubing or electrical tape.
Wire Insulation Repair: Small cracks and tears in insulation can be patched with self-vulcanizing silicone tape designed for auto electrical systems. Wrap the tape around the damaged section with 50% overlap. For larger holes or brittle insulation, wrap the wire in new flexible PVC automotive primary wire.
Doing basic wiring repairs yourself can save money over a mechanic. However, if the wiring damage is extensive, it may be advisable to have a professional diagnose and repair the system.
Lighting System Repairs
Proper lighting is crucial for safe driving, so issues with headlights, brake lights, turn signals, and other exterior lights should be addressed right away. Here are some common lighting problems and fixes:
Headlight Issues
Headlights dimming, flickering, or not turning on can indicate problems with the bulbs themselves, wiring issues, or an alternator not properly charging the battery. Start diagnosis by checking all bulbs and replacing any that are burnt out. Halogen bulbs can be replaced easily, while HID and LED bulbs may require a mechanic’s help. Inspect wiring for damage that could cause an electrical short.
If bulbs and wires check out, a weak battery may not be providing enough power. Test the battery and recharge or replace it if needed. The alternator should also be checked and replaced if not keeping the battery charged while driving.
Brake and Turn Signal Problems
Brake lights and turn signals not illuminating properly are a major safety concern. Check bulbs first and replace any that are burnt out. Also inspect the fuse for those systems and replace if blown.
Faulty brake light or turn signal switches can cause issues, so test switches using a multimeter. Replace any defective switches. Also inspect wiring harnesses and connectors leading to the lights, repairing any damaged wires or bad connections.
Replacing Light Bulbs
When replacing bulbs, consult your owner’s manual for the correct bulb type and wattage for each light. Handle bulbs gently without touching the glass to avoid damage from skin oils. Make sure replacement bulbs are fully seated in sockets. After installing new bulbs, test lights to confirm proper operation before driving.
With routine inspection and prompt repairs, your vehicle’s lighting system will provide maximum visibility and safety. But if you have recurring or complex electrical issues, seek help from a professional mechanic.
In-Car Electronics Repairs
In-car electronics like stereo, power windows, windshield wipers, and power locks can sometimes malfunction and require repair. Here are some tips for diagnosing and fixing common issues:
Stereo
If your car stereo is no longer working, first check that it is getting power. Make sure the stereo is turned on and that the volume is up. Check the fuse for the stereo and replace it if blown. Also, inspect the wiring connections behind the stereo to ensure they are secure. If the stereo still doesn’t work, it likely needs to be replaced.
Power Windows
Power windows rely on switches, motors, regulators, fuses, relays, and wiring. If your power windows stop working, start by checking all fuses related to the windows. Test the power window switches for continuity. Inspect power window motors for damage or worn brushes. Make sure the window regulator is engaging properly. Check all wiring connections leading to each door. Replace parts as needed.
Windshield Wipers
Windshield wipers have motors with linkages and arms that can wear out over time. Check wiper blades and replace if cracked or worn. Inspect wiper arm joints and tighten if loose. Test the wiper motor by activating the wipers. If the motor is working but the wipers don’t move, the linkages may need lubrication or replacement. Adjust or replace wiper arms if needed.
Power Locks
Sticking or inoperable power locks can be caused by faulty actuators, bad door lock switches, or wiring issues. Test switches with a multimeter. Inspect lock actuator gears for damage. Check wiring continuity through door jamb connectors. Spray electrical contact cleaner on any corroded connections. Replace worn parts like actuators or switches to get power locks working again.
When to Seek Professional Help
While many minor Automotive Electrical Repair issues can be addressed with basic tools and some DIY know-how, more complex problems are often best left to professional mechanics. Here are some scenarios where it’s advisable to seek expert assistance:
Safety-Critical Systems
If the issue involves safety-critical systems like brakes, airbags, or engine sensors, it’s not worth the risk of injury to try a DIY repair. Diagnosing and servicing these systems requires specialized tools and software. Let a professional handle any electrical problems that could impact the safe operation of your vehicle.
Intermittent or Difficult-to-Diagnose Issues
An electrical problem that is intermittent, random, or challenging to reproduce can be incredibly frustrating to troubleshoot as a DIY project. Professional mechanics have advanced diagnostic capabilities to identify elusive gremlins. Don’t waste time guessing at a solution.
Major Electrical System Damage
Extensive electrical damage from an accident, fire, flood or rodent infestation often requires wiring harness replacement and intricate repair procedures. Attempting major electrical repairs without proper training can make the situation worse. The cost is also likely to exceed the benefit of DIY.
Lack of Specialty Tools/Software
Many electrical repairs on modern vehicles require the use of scan tools, lab scopes, multimeters and other specialty tools. If you don’t have access to the proper diagnostic equipment, it’s better to have a professional technician handle the repair.
Warranty Concerns
Any electrical fault covered under the vehicle’s factory warranty should be addressed by a dealership technician to avoid voiding the coverage. Don’t cancel your remaining warranty to save a few bucks on a DIY fix.
Uncertainty in Skill or Ability
If tackling the Automotive Electrical Repair yourself seems daunting or exceeds your confidence level, there’s no shame in handing it off to a professional you trust. Their expertise can get your vehicle back on the road safely and efficiently.