The electrical system in a car powers everything from the engine to the lights, radio, and charging ports. Understanding the basic components and how they work together is helpful when troubleshooting electrical problems.
The battery acts as the power source for the vehicle’s electrical system. It provides the initial power to crank the engine for starting and maintains power when the engine is off. The alternator recharges the battery while the engine is running, and also powers the electrical system.
The starter motor engages when the key is turned to start the engine. It spins the engine to get it running. Once the engine starts, a disengagement mechanism releases the starter.
The ignition system creates the high voltage spark to ignite the fuel and air mixture in the engine’s cylinders. It consists of the ignition coil, distributor or spark plug wires, and spark plugs.
The lighting system includes headlights, tail lights, turn signals, and interior lights. These run on lower voltage power and ground circuits. The same goes for systems like the radio, power windows, and charging ports.
Diagnosing electrical issues requires basic knowledge of the major components and how voltage flows through the various circuits.
Common Electrical Problems
One of the most common electrical issues in vehicles is loose or corroded battery connections. This can prevent the battery from properly delivering power to the vehicle’s electrical system. Some signs of loose or corroded battery connections include:
-
Difficulty starting the engine or the engine cranking slowly. This is because the loose connection prevents enough power from reaching the starter motor.
-
Dim headlights, especially at idle. Loose connections cause excessive voltage drop, reducing the voltage reaching electrical components.
-
Battery draining overnight. The loose connection can allow small parasitic draws (less than 1 amp) that slowly drain the battery.
-
Intermittent electrical faults. Vibration from driving can temporarily reconnect a loose terminal, making electrical issues come and go.
The main battery cable connections that should be inspected are the positive and negative terminals on the battery itself, along with the main positive and negative connection points on the vehicle’s frame or engine block. These connection points should be cleaned with a wire brush to remove any corrosion and re-tightened to the proper torque specifications.
Spraying the connections with an anti-corrosion spray after cleaning can help prevent future corrosion issues. It’s also a good idea to inspect where the battery cables route through the vehicle for any chafing or damage that could cause an intermittent short circuit. Replacing damaged cables and wire looming them to prevent chafing is recommended.
Properly cleaning and tightening battery connections is an easy DIY task that can resolve many common electrical issues. However, if the problem persists, the battery cables or connections may need to be replaced entirely.
Battery Testing and Maintenance
The battery is the heart of your vehicle’s electrical system, so keeping it in good working order is essential. One of the best ways to check your battery’s health is by testing the voltage with a voltmeter. Here are some tips on using a voltmeter to accurately test your battery charge:
What You’ll Need
- Voltmeter
- Safety glasses
- Gloves
Make sure to put on gloves and glasses before handling the battery to protect yourself from the battery acid.
Testing the Voltage
- Set the voltmeter to the appropriate scale for testing 12V automotive batteries, usually 20V DC.
- Attach the red lead to the positive (+) battery terminal.
- Touch the black lead to the negative (-) battery terminal.
- With the engine off, the voltage should read 12.4-12.6V on a fully charged battery.
- Now start the engine. The voltage should increase to 13.7-14.7V if the alternator is charging properly.
- If voltage reads under 12.4V when off or doesn’t increase when started, the battery needs charging or replacement.
Testing the Alternator
You can also use a voltmeter to check if your alternator is charging the battery properly while the engine is running:
- Repeat the steps above to connect the voltmeter and check the voltage with the engine off.
- Now start the engine and rev it to 1500 rpm.
- Turn on the headlights (high beam) and any other accessories.
- Voltage should stay between 13.5-15.5V. If it drops below 13V, the alternator may be failing.
Regular battery testing and visual inspections for corrosion can help prevent electrical issues and keep your car starting every time. Check your battery’s charge at least monthly to catch problems early.
Charging System Issues
One of the most common electrical issues in a vehicle is problems with the charging system. The charging system is responsible for keeping the battery charged and providing power to run all the vehicle’s electrical components while the engine is running.
The main component in the charging system is the alternator. Signs that your alternator may be failing include:
-
Dim or flickering headlights – As the alternator fails, it cannot provide enough power to keep the headlights bright. You may notice the headlights dimming, especially when additional electrical loads are on like the A/C or radio.
-
Battery not charging properly – Get your battery tested if you suspect charging issues. A bad alternator will not be able to keep the battery fully charged.
-
Warning light illumination – Most vehicles have an alternator or battery warning light on the dash. This will illuminate if the charging system is not working properly.
-
Strange noises from under the hood – A failing alternator bearing can make grinding or squealing noises. Growling or whining sounds may indicate the alternator is going bad.
-
Electrical components cutting out – If the alternator is unable to provide sufficient electrical power, components like power windows, door locks, or the radio may stop working.
If you are experiencing any of these alternator issues, have your charging system inspected by a professional technician right away. Continuing to drive with a bad alternator can drain the battery leaving you stranded. It’s also important to have the charging system fixed promptly, as an undercharged battery can be damaged.
Starting System Troubleshooting
One of the most common problems with any vehicle’s starting system is a failing or faulty starter motor. This critical engine component is responsible for turning over the engine when you turn the ignition key or push the engine start button. Some telltale signs your starter may be having issues include:
-
A single click or repeated clicking noise when trying to start the vehicle. This typically indicates a weak battery, loose or corroded connections, or a bad starter solenoid.
-
Grinding or whining noises from the starter when engaging. This points to potential wear or damage to the starter drive gear or flywheel ring gear.
-
The starter motor spins but the engine doesn’t crank. This suggests the starter gear is not properly engaging the flywheel.
-
Intermittent operation where the starter works sometimes but not others. This could be caused by a bad ignition switch, loose wiring, or thermal issues with the starter itself.
If you suspect starter problems, some basic checks include:
-
Testing battery voltage and connections to ensure sufficient power is reaching the starter. Clean any corroded terminals.
-
Inspecting wiring and connections to the starter circuit for breaks, damage, or looseness.
-
Testing the starter solenoid by bypassing it with a screwdriver or jumper wire to rule it out as the culprit.
-
Checking the starter mounting bolts to ensure it is securely attached.
- Watching and listening as an assistant cranks the starter to isolate the location of any grinding or whining noises.
If these basic tests don’t reveal the cause of the issue, the starter will likely need to be replaced. When installing a new starter:
- Disconnect the negative battery cable and raise the vehicle if needed for access.
- Disconnect all electrical connectors and wires leading to the starter.
- Remove the starter mounting bolts and extract it from the engine compartment. Compare it against the new unit.
- Install the new starter, reconnect all electrical connections, and reinstall using original bolts.
- Reconnect the battery cable once complete.
With the battery reconnected, test the new starter’s operation. If the issue persists, further electrical diagnosis may be required to pinpoint the fault. Proper starter operation is critical for reliable starting, so never ignore signs of a failing unit.
Lighting System Repairs
One of the most common issues with vehicle lighting systems are problems with the headlights, brake lights and turn signals. Here are some troubleshooting tips for diagnosing and repairing lighting issues:
Headlight Problems
Headlights not turning on is a common problem that is often caused by a bad bulb, fuse, wiring issues or a problem with the headlight switch. Start diagnosis by checking the bulbs first, making sure they are the correct type and wattage for your vehicle. Test the bulbs in a working socket to see if they are burnt out.
Next, check the headlight fuses under the dash or under the hood to see if they are blown. Also inspect the wiring harness leading to the headlights for damage that could cause an open circuit. Wiggle the wiring while the headlights are on to check for loose connections.
If the bulbs and fuses check out, the issue could be a bad headlight switch or a more complex wiring problem. Have your vehicle’s headlight circuits tested to isolate the issue.
Brake Light Issues
Brake lights not working properly or illuminating when not braking can be caused by bulb or wiring problems. Start by inspecting the brake light bulbs and make sure they are the correct type. Test them in a known working socket.
Check the circuit fuses for the brake lights and inspect the wiring harness leading to the tail lights. Damaged or corroded wires can cause shorts. The brake light switch near the brake pedal could also be faulty and need replacement.
If the brake lights stay on all the time, the brake light switch is likely stuck closed and not operating properly. Have a technician diagnose and replace the switch.
Turn Signal Problems
Turn signals that blink rapidly or don’t illuminate are often caused by a burnt out bulb. Check the front and rear turn signal bulbs, replace any that are blown. Make sure you are using the specified bulb type.
Flashing quickly can also indicate an electrical short in the turn signal system. Inspect the turn signal wiring for damage. Make sure to check the hazard light fuse, and flasher relay if your car has one. The flasher unit helps regulate the blinking.
No turn signals at all could indicate an open circuit. Check connections at the turn signal switch, any connectors in the wiring, and ground connections. Have your turn signal system tested to find any opens or shorts that are causing issues.
Ignition System Problems
The ignition system is responsible for generating the high voltage spark that ignites the air/fuel mixture in the engine’s combustion chamber. Failure of ignition system components can prevent the engine from starting or cause misfires, rough running, stalling and power loss. Common ignition system problems include:
Spark Plugs
Spark plugs provide the electrical spark that ignites the air/fuel mixture. Over time, spark plugs can become fouled, worn out, cracked or damaged, preventing them from firing properly. Symptoms of faulty spark plugs include hard starting, engine misfire, rough idle, poor performance and reduced fuel economy. Regularly checking and replacing worn spark plugs is important preventive maintenance. Using the wrong type of spark plug can also cause ignition problems.
Ignition Coils
The ignition coil transforms the low voltage from the battery to the thousands of volts needed to jump the spark plug gap to ignite the air/fuel mixture. Bad ignition coils will cause misfires, rough running, poor performance and hard starting. If just one cylinder is misfiring, the problem is likely a faulty ignition coil.
Distributor
In older distributor-based ignition systems, the distributor routes the high voltage to the correct spark plug at the right time. Problems with the distributor cap, rotor button or ignition wires can cause ignition misfires, rough idle, poor performance and hard starting. Cracked, worn or corroded distributor components need to be replaced.
Regular preventive maintenance like tune-ups, replacing worn parts, and inspecting ignition components can help avoid many ignition system problems. But if you experience persistent ignition issues, it’s best to have your vehicle serviced by a professional technician to properly diagnose and repair the problem.
Electrical Safety Precautions
Working with electricity on vehicles poses some risks that DIYers should be aware of. Automotive electrical systems involve both high voltage from the battery and ignition system, as well as sensitivity to shorts, sparks, and electrostatic discharge. Safety should always come first when performing electrical repairs.
The battery contains sulfuric acid which can cause burns if it comes into contact with skin or eyes. Wear protective gloves and eyewear when handling the battery. Only use tools with insulated handles to avoid shocks. Remove all jewelry which could make contact across terminals.
Take care not to touch positive and negative terminals at the same time, especially with tools. This can cause sparks which could ignite hydrogen gases from the battery. Always disconnect the negative terminal first and reconnect it last to avoid short circuits while working on the system.
Avoid leaning over the battery when testing or filling, as gases can build up and explode if ignited by a spark. Make sure the area is well ventilated. Turn off the vehicle and avoid open flames or smoking nearby.
Use extreme caution when probing live circuits. The ignition system in particular can deliver dangerous shocks. Refer to a wiring diagram and only probe at intended test points. Turn off circuits before disconnecting connectors or splicing wires.
By following basic precautions, you can safely troubleshoot and repair automotive electrical systems. When in doubt, consult a professional technician to avoid potentially hazardous mistakes. Your safety should be the top concern when working with vehicle electricity.
Electrical System Diagnostics
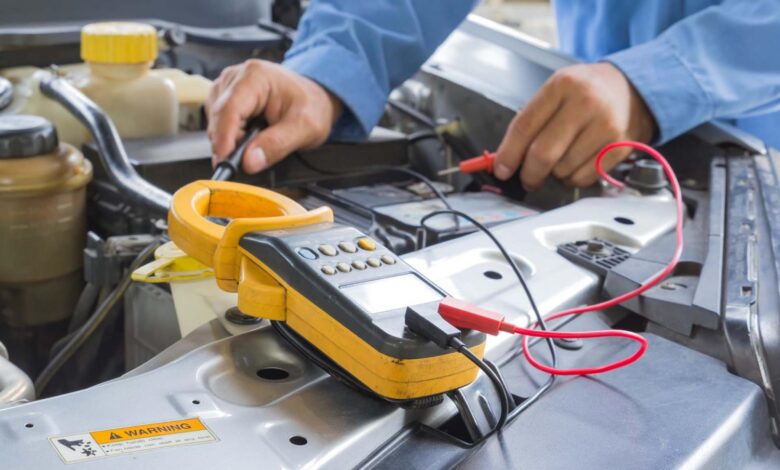
Diagnosing electrical system issues in a vehicle requires specialized tools and knowledge. The most common diagnostic tools are a multimeter and a test light. Knowing how to use these properly is essential for both DIY repairs and professional mechanics.
Multimeter
A **multimeter** is an instrument that can measure voltage, current, and resistance. It allows you to test various electrical components and circuits to pinpoint problems. To use a multimeter for diagnosing automotive electrical issues:
- Set the multimeter to the appropriate mode (voltage, resistance, etc) for what you are testing. Consult the user manual if unsure.
- Attach the red lead to the positive side of the circuit and the black lead to the negative/ground side.
- Power up the applicable circuit. For example, turn the key to RUN to test circuits that operate with the key on.
- Observe the multimeter reading and compare to manufacturer specs to determine if the circuit is operating properly.
- Repeat tests as needed by moving the leads to different points in the circuit.
Test light
A **test light** is a basic tool that lights up when electrical current passes through it. It allows you to quickly check for power at various points without needing to read specific voltage values. To use a test light:
- Connect one end of the test light to battery positive or a known good power source.
- Touch the probe end to points in the circuit you want to test.
- If the test light illuminates, there is power present at that point in the circuit.
- If the light does not illuminate, there is an open or loss of power in the circuit.
Using a multimeter and test light together provides both voltage drop readings and simple power checks for diagnosing electrical faults. Take safety precautions, especially when probing live circuits. Thorough testing and systematic isolation of issues can uncover most automotive electrical gremlins. Knowing the wiring diagrams is also essential for efficient troubleshooting.
When to Seek Professional Help
Most basic automotive electrical issues like replacing batteries, fixing headlights, and testing fuses can be managed by a mechanically inclined car owner. However, more complex electrical problems are often best left to professional mechanics. Here are some signs it’s time to take your car to the shop:
- The problem is difficult to diagnose. If you’ve tested the usual components but can’t pinpoint the issue, a mechanic has high-tech diagnostic tools to locate the problem area. Their expertise can quickly isolate the issue.
- Electrical gremlins cause intermittent issues. Faulty wiring that only causes problems occasionally requires patience and know-how to track down. A technician can monitor systems over time to catch the problem in action.
- You lack the proper tools and parts. Some electrical repairs require special equipment like digital multimeters, soldering irons, crimpers, and wiring connector kits. The investment only makes sense for those doing repairs frequently.
- High-voltage systems are involved. Hybrids, electric vehicles, and auto start-stop systems have high-voltage components that can be extremely dangerous for DIYers. Leave repairs to those with proper training and equipment.
- The repair requires extensive disassembly. Getting to some electrical components like the alternator or instrument cluster means removing many other parts. A professional can access and reinstall these faster.
- You’re unsure about electrical safety risks. Working around batteries, live circuits, and engine electronics poses electrocution hazards if proper precautions aren’t taken. When in doubt, have a shop address the repair.
The convenience of DIY electrical repairs can quickly turn frustrating without the right skills and tools. Know your limits, and don’t hesitate to have professionals handle the more advanced or safety-critical issues. Their expertise can save you time and money in the long run.